Showing posts with label recipe. Show all posts

Friday, November 6, 2009

Garlic Brown Sugar Chicken

It's been a busy week for me! I've tried a few new recipes for dinner and have been waiting to see how they all turned out before I chose one to write about. And it was not hard to choose a winner! This Garlic Brown Sugar Chicken recipe I made last night was sooooooo good. It had so much flavor to it; it could even be my most favorite chicken recipe EVER. You should definitely try it!

But before I give you the recipe, I'll at least tell you about the other 2 recipes I tried out in case you want to give them a try too.

Monday night we had Beer Battered Tilapia
I don't really like fish, but I thought it was pretty good. We ate it with some tarter sauce, brown rice, and a vegetable.

Tuesday night we had Almond Chicken with Rice
This was also a good recipe, but I thought there could've been more flavor. I got this recipe from sparkrecipes.com, so it's healthy at least! Also, I accidentally bought cashews instead of almonds, so that might've changed the taste a little, but I don't think that would've affected it too much.

And lastly, last night we had Garlic Brown Sugar Chicken
This was also from sparkrecipes.com, so it's another healthy one! If you click on the link, it'll take you to the website so you can see the nutrition info.

And this was definitely good! I don't have any pictures because we were so hungry and ate it right away, haha. But I plan on making this again next week, so I'll try to remember to take one then.

Ingredients
Brown sugar, 4 tsp. unpacked
3-4 Chicken breasts, no skin (I made 3)
Garlic, 1 clove (I used minced garlic, like I use for everything that calls for garlic)
Butter, salted, 2 tbsp. (I just used 2 tbsp. of "I Can't Believe It's Not Butter" because that's what I had)
Salt, 1 tsp.
Dash of pepper

Directions
1. Melt butter in a frying pan
2. Brown the garlic in the butter
3. Add chicken breasts to garlic and butter and cook thoroughly, adding salt and pepper as you like
4. When chicken is fully cooked, add brown sugar on top of each chicken breast
5. Allow the brown sugar to melt into the chicken (about 5 minutes)

I just can't believe how much flavor was in the chicken! And it was so easy to make. Try it!

Friday, October 30, 2009

Better than Auntie Anne's!

Or whatever that pretzel shop is at the mall. I made homemade soft pretzels, and they were gooood!

I feel like all I've been writing about lately is food and new recipes. For some reason, I've been really into baking and cooking lately. I even have 4 new dinner recipes I want to try next week! Don't worry, though, I'm not forgetting about the other stuff on my list, but I just feel like it's not as fun to write about.
But just to let you know...I have completed #36: Apply for Financial Aid for School. I have also completed #48: Buy a new door for our bedroom. And also part of #77: Get my hair highlighted once a year. But what else can I say about those, you know?

Also, I have been taking my multivitamin every day. I still go to the gym at least 3 times a week, but with this running program I've been doing, it's more like 6 days a week. Etc. etc. etc.

So now for something more fun, I made homemade soft pretzels!

Seeeeee.


They're so pretty.

I put sea salt on half of them:


And a cinnamon-sugar mixture on the other half:


I found this recipe online, and realized that I already had all the ingredients at home already! That's always nice. So, I went home and made the dough right away!

Ingredients:
3 1/2 cups flour
4 tbsp. brown sugar
2 tsp. salt (sea salt preferably)
1 tbsp. yeast-dissolved in water
1 cup water--warm, but not hot
1 tbsp. baking soda mixed with 1 cup of boiling water
1 egg beaten with 1 tsp. water

Directions:
Mix water, yeast, brown sugar, and salt in a mixing bowl. Add flour until dough is smooth. If the dough is sticky, add more flour.

If you can, let the dough sit overnight in the fridge.

Then, take the dough, and divide it into pieces. I divided mine into 9 pieces, and the pretzels were a good size I though. If you want them bigger, you can divide the dough into less pieces. If you want them smaller, you can divide the dough into more pieces.

Roll each piece into a thing rope. I had trouble with this step, and I felt my ropes weren't too thing, and my pretzels still turned out fine. So, if you're worried your ropes of dough aren't 'thin' enough, don't worry!

Then, shape the dough into an upside-down U shape on your surface, twist the ends and bring them down to the bottom of the pretzel. (Hope that makes sense!)

Place the pretzels on a greased cookie sheet, and let rise for 30 minutes.
Next, either brush each pretzel with the baking soda-water mixture. However, if you want a chewier crust, put 2 tbsp. baking soda in 4 cups of boiling water and drop the pretzel in that mixture for a few seconds and then take it out with a pancake-turner thing with slots in it, so the water can drain out. I did this option, because I wanted chewier crust.

Then, brush each pretzel with the egg-water mixture. This will put a nice shiny glaze on the pretzel.

Sprinkle each pretzel with sea salt, or whatever you want to top them with. (I did half sea salt and half cinnamon-sugar) and bake in the oven at 425 degrees for 12-15 minutes. Or until browned.

And enjoy! Yum!

And because tomorrow is Halloween, I'll leave you with some pictures of the Halloween-shaped shortbread cookies I made last week!


Thursday, October 29, 2009

Andddd we have a winner! (bread related)

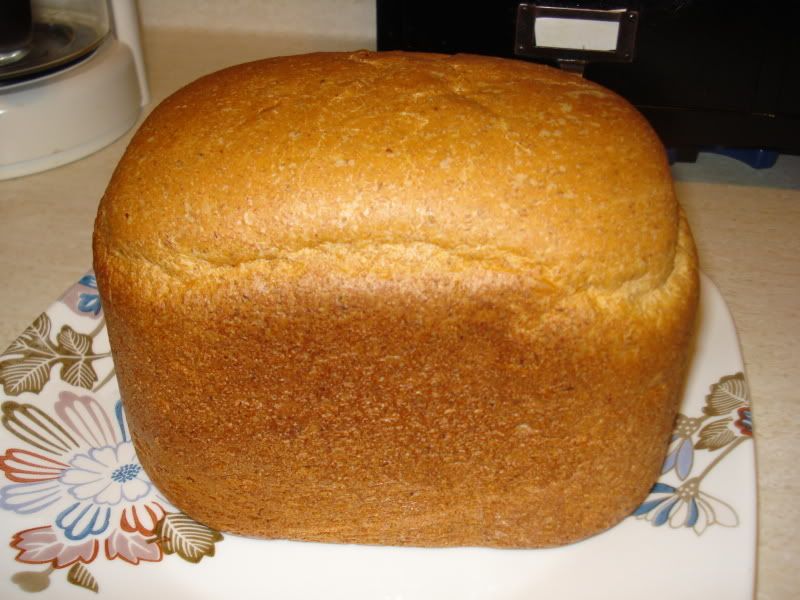
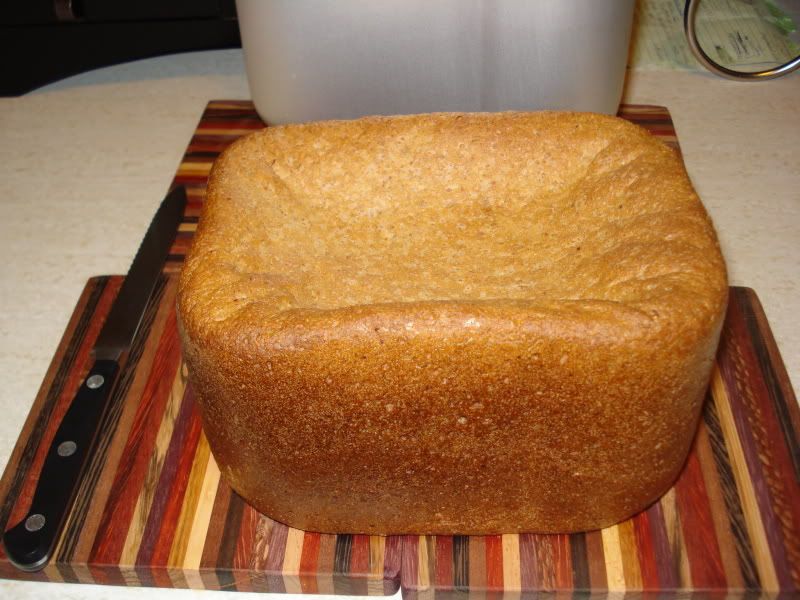
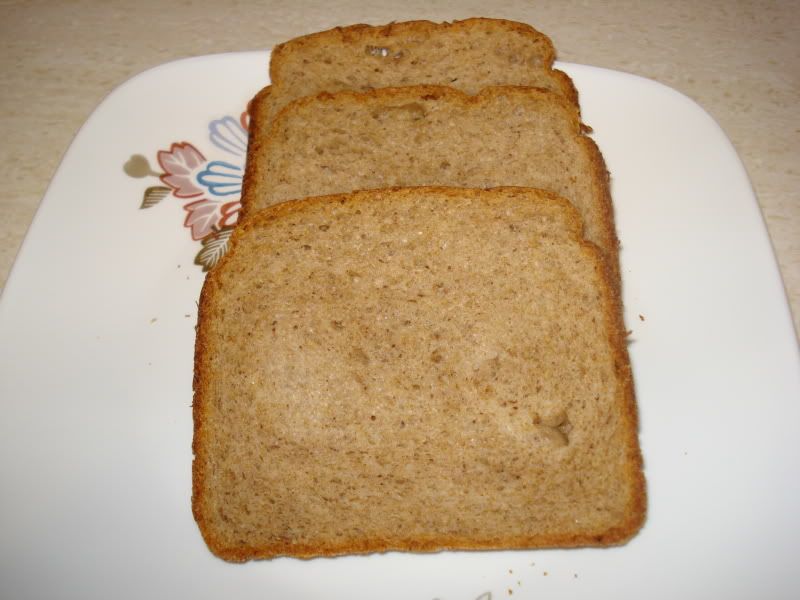
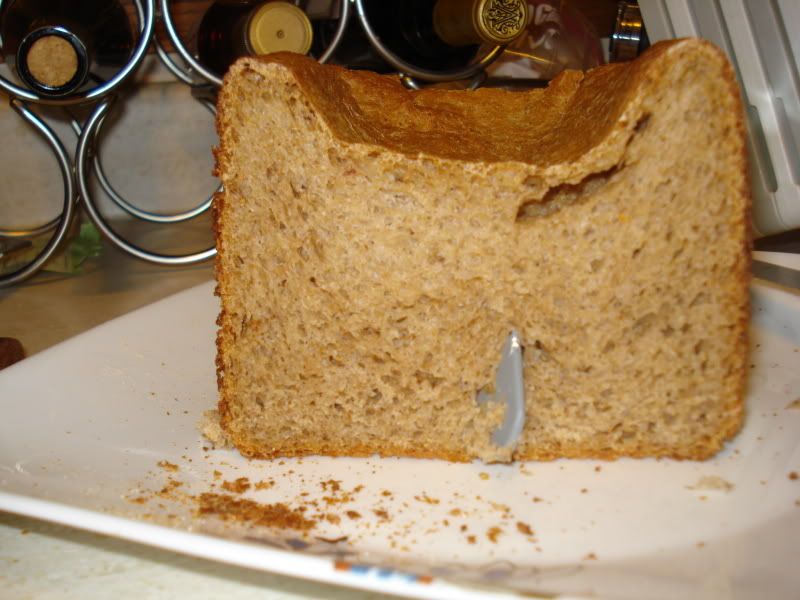
It seems that we have found a great bread recipe, after trying a few! This one did everything we wanted it to--it rose well, without sinking in at the top, it didn't get the bread-kneader thing stuck in it when I took it out of the pan, it made nice BIG slices, and most importantly, it tastes good!

Here is the wonderful recipe:

Ingredients:
1 cup warm water
1 packet yeast (I think that's 2 1/4 tsp?)
2 tbsp honey
1/4 cup vegetable oil
1 1/2 cups whole wheat flour
1 1/2 cups bread flour
1/4 cup flaxseed meal
1 1/2 tsp. salt

Directions:
Place water and yeast in bread pan and let it sit for 10 minutes.
Then, add the rest of the ingredients in the order listed.
Set bread machine to Basic bread; light crust setting.

Here's a couple things this recipe does differently, which I think makes the bread turn out better. First, it has me add the yeast directly to the water. I'm not an expert at bread baking, but I think a lot of recipes tell you not to let the yeast touch the wet ingredients. So I thought this step was weird, but it definitely worked! This recipe also had me adding more salt--which helps the bread rise more. And lastly, even though it's technically wheat bread, I should set my bread machine to the basic bread setting, not the wheat bread setting. The basic bread setting doesn't bake it as long as the wheat bread, which makes the crust not as hard.

Now, here's some side-by-side pictures for your comparison to my last recipe:


See how the top actually rises? :) And here, it's sunken in. :(


These pieces look normal. And these pieces don't. And the
kneader is stuck in there.


So there you have it. Good sandwich, and toasting bread.

Stay tuned...I will soon be posting aout my homemade soft pretzels I recently made and my Halloween shortbread cookies!

Wednesday, October 21, 2009

Peanut Butter Oatmeal Chocolate Chip cookies


I was making these cookies for Josh to bring to a church group that he's in. It turns out, however, that it wasn't actually his turn to bring the snack this week. Soooo, now we have a ton of cookies to eat ourselves. Not only did I make these cookies, but I also made some shortbread cookies for him to bring as well. That's for another post though. :)

I got this recipe from Krystal, who always has a ton of good recipes on her blog! I don't ever make cookies from scratch. Usually I just buy the dough and bake it. But I had some time on my hands, so I gave it a try. And it was very easy. And I got to use my big mixer!
Ingredients:
1/2 cup butter = 1 stick of butter
1/2 cup white sugar
1/3 cup packed brown sugar
1 cup peanut butter
1/2 teaspoon vanilla extract
1 egg
1 cup all-purpose flour
1 teaspoon baking soda
1/4 teaspoon salt
1/2 cup rolled oats
1 cup semi-sweet chocolate chips (I actually bought chocolate chunk pieces. You can also do 1/2 cup chocolate chips and 1/2 cup mini peanut butter cups)
Directions:
1. Preheat oven to 350 degrees.
2. In a medium bowl, cream together the butter, & sugars until smooth. Stir in the peanut butter, vanilla, and egg until well blended.
3. In a medium bowl, combine the flour, baking soda and salt and mix well. Stir into the batter until moistened.
4. Mix in the oats and fold the chocolate & peanut butter chips until evenly distributed. Using my cookie scooper by the tablespoon onto the cookie sheet.
5. Bake for 10 to 12 minutes in the oven, until the edges start to brown. Cool on cookie sheets for about 5 minutes before transferring to wire racks to cool completely.

Yield: 3 dozen cookies

I think the most amazing part may be that I actually made exactly 3 dozen cookies! Usually recipes say that it makes a certain # of cookies, and I get maybe 2/3 of that. But I actually got the right amount this time.
Enjoy!

Friday, October 16, 2009

Breadmaker Bread

I've had my breadmaker for a while. But haven't used it in years. I decided to give making my own bread a try for a few reasons: to try and save money on bread, and because I love how my house smells while it's baking. I found a recipe that I liked and then went out and bought the ingredients. I even calculated how many loaves of this recipe (assuming I liked it) I could get from my ingredients to calculate my cost savings on bread.

Here's the breakdown:

King Arthur 100% Whole Wheat Flour $4.04--can get 12.67 loaves

King Arthur Bread Flour $4.04--can get 15.2 loaves

Flaxseed Meal $3.45--can get 17 loaves

Yeast--$.50 per packet--1 packet per loaf


That's all the stuff I had to buy. The recipe also called for honey, butter, water, and salt. But I had those ingredients so I did not include those in my costs.

I bought the 'King Arthur' brand of flour because I heard it was good for baking bread and it was on sale. (It's usually $6.50!). If I buy the Pillbury brand of flours (which I'd probably do next time)-- those were $2.55 each, so my cost saving would be more.

I took the amount I spend on ingredients minus the yeast--11.53--and divided it by the lowest number of loaves I'd get using up these ingredients--12--and it comes out to about $.96 per loaf. Add the yeast packet to that and it comes to $1.46 per loaf.

The bread I usually buy from the grocery store is the 100% Honey Whole Wheat by Sara Lee. That usually runs me about $3.30 a loaf. So, my cost savings per loaf is $1.84. I'd say that's pretttttty good.

But now let's get to the bread. I found this recipe online. I chose one with flaxseed because it adds more protein, fiber, and other gooood stuff.

Honey Whole Wheat and Flaxseed Bread

1 1/8 cups warm water (110 degrees)
1/4 cup honey, warmed in microwave
3/4 tsp. salt
1 1/2 cups whole wheat flour
1 1/4 cups bread flour
1/4 cup flaxseed meal
2 tbsp. melted butter
2 1/4 tsp. active dry yeast (1 packet)

Add ingredients to bread machine in the order written. Wheat cycle, light color setting. On my bread machine, the wheat setting takes 3 hours and 40 minutes.
And now here's my finished product.

Here's my first problem. Is the top of the bread supposed to be sunken in like that?


Here's the side view.


Here's the handy dandy bread machine bread cutter thing and electric knife, courtesy of the mother a long long time ago. Fortunately, I didn't throw either of these out, even though I'm sure I've thought about it before, as they take up room in my little cabinet space.


Here we are to problem #2. The thing inside the bread maker that kneads the dough and all that came out into my bread when I took my bread out. Does this always happen? It make it awfully difficult to cut once I got to this part.


And here is the sliced finished product. Even with the handy dandy bread machine bread cutter thing, it was a little difficult to slice the bread evenly.


And my one last complaint. I thought the crust of the bread was a little hard. Is it always like this? I feel that this bread wouldn't be good for sandwiches, which is what Josh and I use bread for the most. The crust is hard, and the inside is kind of crumbly. Therefore, my cost savings making bread over buying it might not come into play as I might have to go out and buy some bread now.

If you make bread--can you tell me if I did something wrong, or if this is what bread maker bread is usually like?

I did already eat a piece and it was definitely good, just not what I thought it was going to be.

Monday, September 14, 2009

Well, at least it was edible..

I tried a new recipe, again, last night. I think I'm just getting bored with our normal food. And as I said in my title, at least it was edible.. I think that's all it had going for it. My one tip for you after making this recipe: make sure you have all your ingredients before you start! I realized that I didn't have some of the ingredients that I could've sworn I had, as I was making each part, so it was too late. I improvised without them, and it just wasn't the same.

The recipe I tried was actually a few recipes I put together--fettucine alfredo with chicken and sauteed spinach.

Because I'm feeling lazy right now, I'm just going to link to where I got the recipes from instead of type them all out. I apologize in advance.

Alfredo Sauce

My problem with this is that I only had HALF of the amount of parmesan cheese I was supposed to. Therefore, the sauce didn't quite thicken enough. I find that to be a problem. Alfredo sauce is supposed to be thick. But like I said, it was still edible.

Sauteed Spinach

And my problem with the sauteed spinach is that I didn't have any garlic. I usually use minced garlic whenever a recipe calls for garlic. And I guess that was my problem--I always use it. Therefore, I didn't have any like I thought I did. So I sauteed it without garlic. It was still pretty good, but I'm sure it wasn't the same.

I am happy to say that the chicken and fettucine noodles were very good. :-) I have to say that I am liking chicken thighs wayyyy more than chicken breasts lately. Next time I make this, I will make sure I have all my ingedients first.

Here's my non-professional picture of the meal.

Monday, September 7, 2009

Crock Pot Baked Potato Soup!

I've already made my 3rd new recipe of the month--Crock Pot Baked Potato Soup. And it was very good! I guess I have a lot of time on my hands now that I'm just working part-time. :-) This recipe had a little more prep work that I would normally like for a crock pot meal, but, it was definitely worth it.

Just one tip--the recipe says to bake the potatoes for 45 min. to 1 hour, however, I found that I had to bake them about 1 hour and 20 minutes in order for them to be fully baked. Different ovens may vary I guess, though. Here's the recipe!

Ingredients
4 large baking potatoes
2/3 cup butter or margarine
2/3 cup flour
6 cups milk
3/4 tsp. salt
1/2 tsp. pepper
4 chopped green onions
12 slices cooked and crumbled bacon
1 1/4 coups shredded cheddar cheese
8 oz. light sour cream
1 1/2 tsp. chicken bouillon granules
additional cooked bacon (optional)

Preparation
1. Wash potatoes and prick several times with a fork.
2. Bake in foil in a preheated oven (I put mine in at 375 degrees--the recipe didn't say specifically) for 45 min. - 1 hour (or longer)
3. Let cool.
4. Cut potatoes into cubes.
5. Melt butter in a heavy sauce pan over low heat (med. to large sized sauce pan)
6. Add flour, stirring until smooth.
7. Cook 1 minutes, stirring constantly
8. Gradually add milk
9. Cook over medium heat, stirring constantly until mixture is bubbly.
10. Pour into crock pot and then add potato cubes, salt, pepper, green onions, crumbled bacon, cheddar cheese, and chicken granules.
11. Cook on high for 4 hours.
12. Stir in the sour cream right before serving.
13. If soup is too thick, add a little milk at a time until desired thickness is achieved.
14. Garnish with additional sour cream, bacon, and/or cheese.

The recipe says this makes 6 servings. However, I think it makes a lot more. I guess it depends on how much you eat! There were 4 of us who ate this for dinner the night that I made it. And there was definitely more than 2 servings left! Josh and I then ate some leftovers for dinner the next night, and there was still a good amount left over that I am freezing it to eat at a later date. Maybe we just don't eat much, I don't know. ..
Good serving suggestion--go to Panera Bread and buy some sourdough bread bowls and serve the soup in that! But I am big on Panera bread bowls. :-)

Here is my picture of the soup. I feel this doesn't make it look tooo appetizing, however, it is good. Trust me.


And now I guess I have a 4th new recipe that I made this weekend as well. It's the one thing that Josh said he wanted when he got out of the hospital. Cheesecake. I have made cheesecake before, however, but not this kind.

This was a New York Style Cheesecake. I added my own touch to it though, and topped the cheesecake with Ganache Glaze that I wrote about in a previous blog.

Ingredients for Cheesecake
4 packages cream cheese, softened
1 can condensed milk
1/3 coup flour
4 eggs @ room temperature
1 tbsp. vanilla

Ingredients for Graham Cracker Crust
1 1/4 coups crushed graham cracker crumbs
1/4 cups granulated sugar
5 tbsp. melted butter

Preparation
Crust:
Combine all ingredients and press firmly into a 9" spring form pan

Cheesecake:
Preheat oven to 350 degrees
Beat cream cheese with electric mixer
Greadually beat in milk
Add eggs one at a time
Add flour and vanilla and mix together

Pour in crust
Wrap botton of the pan with foil and put in a shallow baking pan
Add 2 cups of hot water in the shallow baking pan
Bake 1 hour or until lightly browned

Friday, September 4, 2009

My favorite Taco Bell food--homemade!

Getting my new recipe for September over with already! Actually, there's 2 recipes here. And I am planning on making homemade baked potato soup tomorrow for another new recipe. Stay tuned for that one. :-)

First, let me say that I haven't eaten Taco Bell in probably 10 years. But my favorite food there that I used to eat was the Mexican Pizza. Yummmm. I decided to give it a try myself, hoping I don't feel as 'gross' after I eat it, like I did with Taco Bell. And the results: it was very good! Here's the recipe I used:

1 1/3 pounds ground turkey
1 package taco seasoning
1/3 cup water
6 (10-inch) flour tortillas
cooking spray
3 tablespoons chopped green onions
8 oz. refried beans
1 1/2 cups diced tomato (about 1 medium tomato)
3/4 cup taco sauce
1 1/2 cups shredded cheese (I used cheddar, but you could also probably use the Mexican cheese as well)

Preheat oven to 350 degrees

Heat a large skillet over medium heat and cook the ground turkey until brown. Drain.
Return to the heat and add the taco seasoning and water. Continue to cook for several minutes, stirring often.

Spray both sides of each tortilla with cooking spray and place directly on the middle oven rack. Bake for 6 minutes, turning halfway through, until golden brown and crispy. Watch carefully so they do not burn. Remove from the oven and place on a baking sheet.

Then turn oven to 400 degrees.

Microwave the refried beans 30-60 seconds, or until spreadable.

Lay 3 tortillas out on baking sheets (I could fit 1-2 per sheet). Top each tortilla with 1/3 of the beans, 1/3 of the ground turkey mixture, and 1/4 cup cheese.

Top with another tortilla and press down lightly. Top the second tortilla with 1/4 cup taco sauce, 1/2 cup diced tomatos, 1/4 cup cheese and 1 tbsp. green onions.

Bake for 5-10 minutes or until cheese is melted. Cut into wedges. Can serve with sour cream or salsa if desired.

Here's the top of the pizza.


And here is my attempt to take a picture of the middle. Just trust me, it'd good.


We were having some company over for this, so to add another dish, I decided to give some Mexican Rice a try. I debated just going out a buying boxed Mexican Rice, but decided to give it a try on my own. And I'm glad I did! It was super easy and very good. Here's that recipe:

3 tbsp. vegetable oil
1 cup uncookd long-grain rice
1 tsp. garlic salt
1/2 tsp. ground cumin
1/4 cup chopped onion
1/2 cup tomato sauce
2 cups chicken broth

Heat oil in a large saucepan over medium heat and add rice. Cook, stirring constantly, until puffed and golden. While rice is cooking, sprinkle with salt and cumin.

Stir in onions and cook until tender. Stir in tomato sauce and chicken broth; bring to a boil. Reduce to low heat, cover and simmer for 20-25 minutes. Fluff with a fork.

Sunday, August 2, 2009

Dirt Cake!

Getting my new recipe of the month out of the way early--I made Dirt Cake for Josh's birthday yesterday! We tried it last night, and it was good! Yay me.


Here's the recipe: (courtesy of my mother!)

1. Crush one large pack of oreo cookies in blender. Set aside.
2. Cream together: 1/2 stick margarine, 8 oz. softened cream cheese, and 1/2 cup powdered sugar.
3. In another bowl, mix well: 3 cups milk, 2 packages instant french vanilla pudding, 12 oz. cool whip
4. Combine #2 and #3 together and mix well.
5. In a plastic pot (8 inches or so) layer crushed oreo cookies and pudding mixture, ending with the cookies on top.
6. Put in gummy worms or gummy squirrels as you desire.


Side note: Cover the hole at the bottom of the pot with tin foil if there is a hole!


And here are my pictures:


And in a completely unrelated to anything note: Cake Boss is my new favorite show! :-)

Tuesday, July 21, 2009

Guacamole!! And a good run. :-)

I made my new recipe for the month thanks to my good friend, Sarah. (See previous blog...that's her). She's a great cook and gave me her recipe for guacamole. Usually I just buy guacamole, because let's face it...that's just easier. But I figured I could give it a shot. And it was easy. And very goooood.

Here's the recipe:

2 avocados
1/2 tomato, diced (the recipe actually calls for 1 roma tomato, but I'm not going to lie--I don't know what I roma tomato is.)
1/2 onion, diced
1 serrano pepper (when cut in half length-wise, remove half the seeds and membrane)
diced handful of cilantro (decorates the top of the guacamole when it's all mixed)
Course salt to taste (sea salt or kosher)

To prepare it, pretty much just mix everything and put the cilantro on top. :-)


Here is my picture of the ingredients:


And here is the finished product:


Yummmmmmmmmmmmmmm.


And then to work off allll the guacamole I ate on Saturday, I ran in my 3rd 5k of the summer on Sunday morning! This completes #68 for this year, anyway, of running 3 5k's a year. We still might do more, to get some more practice and try to improve our times, but at least I know that if I don't, I have satisfied this item for this year!

This race was for my work. My work is having it's big 'Annual Meeting' this week, where people from all over the country come to Milwaukee, where my company is headquartered. Every year there is a 5k/10k run, and this year, there were a record number of about 8200 people that signed up! That's a lot of people to try to dodge while you're running, so I tried to start in the front of the pack. And that strategy pretty much worked--I only had to dodge a few slow people in the beginning. And most importantly--I GOT MY BEST TIME EVER FOR A 5K! My official time was 23:32. Or a pace of 7:35 per mile. I was very very very very happy.

I started out doing realllly well--the first mile I ran in 7 minutes, the second mile I ran in 7:25, but that last mile was tough. The last quarter mile of the race is just about allll up hill. This is the 5th time I've run this race, so I should know that hill is coming in the end, but it still catches me by surprise and definitely slows me down. Oh well, I still got a good time, and am happy for that.

Here's my official time, thanks to http://www.onlineraceresults.com/, just in case you don't believe me. :-)


bib number: 1874
age: 26
gender: F
overall place: 188 out of 1498
division place: 6 out of 81
gender place: 19 out of 449
time: 23:32
pace: 7:35

Sunday, June 28, 2009

A Whole Bunch of Stuffff

This is going to be an update post. As I said in my last blog, I've been super busy lately and haven't had time to update too much. I guess that's what summer does to you! But here are a few things that have been going on:

I made a couple new 'recipes' this week. They're not realllllly recipes, but they're new meals for that I haven't made before (even though they're super easy), so I'm going to count them! The first one is chicken and cheese quesadillas! Yummmmm. I even made some extras of these to eat as leftovers for lunch. All you need is chicken, shredded cheese, and some tortillas and you're good to go. I made them on my griddle and they turned out just fine. I supppose you can use an actual quesadilla maker, but I see no need for it. To make them even better, dip them in sour cream and/or guacamole and your meal is complete!

The second new 'recipe' I made this week is marinated chicken. Why didn't I think of this before!?! Wayyyy better than regular grilled chicken. I just bought a marinade in a bottle from the grocery store and poured it into a big baggie, put a few chicken breasts in, and let it sit in my fridge overnight. The next night for dinner, I grilled them on our George Foreman grill and they were very lemon-peppery! :) I wanted to make them on an actual grill, but Josh didn't come home from work until later, and I was too nervous to attach the propone to the grill myself. I would probably blow everything up. :)

On to update #2. I have now finished the second Twilight book: 'New Moon.' It was as good as the first, and now I can start on book #3! On a related note--Josh and I rented the Twilight movie on our Apple TV last night. I do have to say that I was not as impressed with the movie as the books. We didn't even finish the whole thing. I thought the acting and lines were pretty choppy and they just stared at each other a lot. I might have to try watching the rest of the movie by myself tonight to see if it gets better.

If you've seen the movie and read the books--what do you think?

And lastly, I have now completed #87: Volunteer for something with Josh. We volunteered in the beer tent at Fiesta Waukesha--which is put on by La Casa de Esperanza. It was a very nice day for it and it looked like there was a decent turn out for the event yesterday.

Here's a picture of Josh in the coooool t-shirt we got:

Tuesday, May 19, 2009

I made THREE new recipes this week!

And now I will tell you about them. All were good! Two were very good, and one was just plain old good. But I think with some trial and error, that plain old good recipe can be made into very good.
Because I'm lazy, and so this blog post doesn't become toooo long, I'm just going to post links to the actual recipes, instead of typing them all out on here. Same thing anyway. You are in luck, however, because I did remember to take pictures of all three!

Let's start with the one I made first. I made this as a dessert to bring to Josh's family's get together. While it didn't quite look like the picture, it was still VERY good and I didn't have any leftovers to bring home...always a good sign!

Layered Strawberry Cheesecake Bowl

These are all the ingredients used:

Here's what it looks like after the strawberries are added:

And now here's where I encountered my first problem. I realized the bowl I used was bigger than the bowl that is recommended, therefore, my top layer of filled didn't quite cover up the strawberries and pound cake like it should've. Oh well, it still tasted great. Looks aren't everything.


And here is where I encountered my second problem! I was supposed to melt the chocolate and 'drizzle' it over the filling. Yeahhhh right. That chocolate showed no signes of drizzing. Therefore, it was dropped on in clumps. Doesn't make it pretty, but it still was good.


And apparently, I forgot to take a picture of the final product. You can look at it in the link up above, or I can just tell you that you put some whipped cream over this and then add some chocolate covered strawberries on top of that. And walla. It's done.


Caesar Pockets

Here are the ingredients used:

The picture turned out kind of weird, but here is everything mixed up in the bowl:

And finally, here are the finished pita pockets!


This is my just 'plain old good' recipe. Everything was good, however, I think for my taste, they could use a littttle LESS caesar dressing. I put same amount in as the recipe calls for, but I feel like all I could taste was the caesar dressing. Next time, there will be less! There have been took to take for lunches to work to mix up my usual, boring turkey sandwiches. :)

Creamy Parmesan Mashed Potatoes

Josh just got his wisdom teeth out today! I made these for him to eat in the next few days when he can't have any hard foods. I tried a bite before I put them in the fridge for him, and they were very good! Definitely creamy!

Here's a picture of all the ingredients used:

Here are the potatoes boiling in the broth:


And here is my final product:

And there you have it. I probably won't be doing this much cooking again for another month at least. It's a lot of work!
If you happen to make any of these recipes, let me know how you like them!!

Sunday, April 12, 2009

Your traditional Easter meal

Josh and I had some family over for an Easter lunch today after church. And of course, I made your traditional Easter food: bbq pulled pork sandwiches, taco dip and chips, veggies and dip, and cookies. :-) It's all food I like, anyway!

These pulled pork sandwiches turned out to be a new recipe for me. So I have now completed my new recipe for the month of April. It was very simple, and very good! Sorry, no pictures this time around though. I forgot. :-)

Here's the recipe though:

2 lbs. pork (I used the shoulder cut...it was the cheapest!)
1 can root beer (any brand)
18 oz. bbq sauce
8 hamburger buns

Place the pork in a slow cooker. Pour in one 12 oz. can of root beer. Turn slow cooker on low and cook for 6-8 hours, until meat is very tender.

Drain meat and pull it apart. (If it's done, it should pull apart very easily)
Add bbq sauce and put back in slow cooker for 1-2 hours on low.

And enjoy!

This should make about 8 sandwiches.

See, I said it was very easy. We tripled all the ingredients because we had a lot of people coming over to eat. And we barely have any leftovers; so that's always a good sign!

And because I like pictures, I will put up some of our FINALLY finished bathroom project. What we thought was going to a 2 day weekend project took about 1 1/2 weeks. We finally got to use our shower this morning for the first time in about 10 days. And it was nice.

In short, what we did was take down the old tile and drywall in the bathtub area to put up new drywall and new bathtub walls. We also wanted to change the fixtures for the shower. That turned into a big project in which we had to re-do much of the piping in that area. But it's done. And it works. And it's beautiful.

Here's our new shower walls and fixtures:


We still have to finish up some painting and other little projects, but at least we can shower here again! :-)

Sunday, March 15, 2009

A new recipe and a new love

Actually, two new loves! We'll start with those. This has nothing to do with my list, but worth talking about anyway. :)

#1: Chewy, Giant Nerds candy. Nerds are great just as they are, but these new chewy, giant version are wonderful! I think you should go out a buy a box right now!

#2: Trader Joe's grocery store. We've had one for a couple years now--maybe even longer than that. I don't keep up with that kind of thing too often. However, it's about 20 minutes away, so I never even thought about going to check it out. Josh just got back from California on Friday, though, and while he was there, he got to have the Trader Joe's experience. After hearing him talking about it, I definitely wanted to try it! And I was in LOVE! There were so many good things! But we made sure not to go over our grocery budget. :) A few noteworthy things I was excited to buy: Trader Joe's little peanut butter cups, 3-cheese pizzas, their refridgerated pizza crust, frozen stir fry, protein drinks, and lemonade iced tea. And there's a few things I'm excited to try next time we go back, including the orange chicken. Yum! If you have one near you, I'd recommend you go to it!

Ok, now onto the list. I'm still working on #38: make a new recipe each month. This month's recipe doesn't have a name, I don't think. But I'll made one up anyway. Let's call it "Squirrel Chicken." But don't worry, there's no squirrel meat in it. It was just so good, it made me think of a squirrel! I got this "recipe" from my good friend, Liz. I put "recipe" in quotes, because I didn't really have a recipe, and neither did she. I'm sure there's an actual recipe for this somewhere, but she just told me a meal she likes to make.

Here's the ingredients involved:

Chicken breasts (we used two, because there's 2 of us)
Olive Oil
Italian style bread crumbs
Provolone cheese slices (like the deli slices)
Toothpicks

And here's the "recipe:

Pound each chicken breast with one of those meat-pounder things to make it thinner. (these aren't technical terms)
Pour some olive oil on each chicken breast--make sure it's covered in it
Dip chicken breast in the bread crumbs
Place chicken breast on a plate and put a piece of provolone cheese on top.
Roll up the chicken breast and put some toothpicks in it to make it stay.

Put in greased pan.
And bake.

Now, since we didn't have an actual recipe, I just baked it for 30 minutes at 375 degrees. I started out doing 20 minutes, but after I took them out and cut them open, I saw they weren't quite done yet, so I put them back in the oven for 10 more minutes. That seemed to be a good amount of time.

And they turned out very well! Josh was very pleased with this dinner. Josh made us mashed potatoes and we also had a vegetable to round out our meal.

Here are some pictures of the chicken:


Now, you'll see on the left of this picture, that piece of chicken isn't rolled up. That was a "problem" piece of chicken. Problem meaning, it just didn't want to be rolled. Very stubborn squirrel chicken. I think the next time I make this, actually, I'm going to do that instead. I'm sure it'll taste the same, it'll cook much quicker, and it'll save me time and patience trying to roll them! I wasn't very good at that. :) All in all, it was a great meal though!

One last picture for your viewing pleasure:


This is Josh (after un-grouting our bathtub) holding the bottle of wine I got him for his birthday a few years ago. I customized the label of a picture of us, and we tried to keep it all this time. However, I don't think it wants to be kept, as it is now growing something nasty in the bottom of the inside of the bottle. Therefore, it was time to say good-bye to the wine bottle. It was a sad day. Not only because we had to throw out the wine bottle--but also because of the events that occurred during the un-grouting process. But that's for another blog. I'm not ready to talk about that yet.

Sunday, February 8, 2009

Just call me Martha Stewart

Wow, yesterday was a big day for my list! I don't know where to start. Well, I guess I'll start with the ones that I'm 99% sure you don't care about. I took my vitamin all 7 days in the past week! And, I went to the gym 4 days. Oh, and I did give Josh a massage at least 3 days. Probably more. Yay.

So, now onto the ones that are more interesting to write about.

First, #42: Bake something from scratch. This probably the most exciting one! I am completely knocking #42 off of the list. That's not to say, however, that I won't bake something else from scratch in the next few years. Yesterday, I made a brownie cheesecake from scratch. And it was awesome. There were 4 parts to this cheesecake, and I'm happy to say that every.single.part turned out. I got this recipe from this blog: http://lepetitpierogi.blogspot.com/search/label/Cheesecake , who got it from someone else's blog, who probably got it from someone else's blog, etc..

The first part of the recipe involved making brownies from scratch. I could've just stopped there as far as baking something from scratch, as I've always just made brownies from the box. But I decided that if I was going to do this, I was going to do this big.

Here's the brownie recipe:
Ingredients:
4 ounces unsweetened chocolate
3/4 cup (1 1/2 sticks) unsalted butter
1 3/4 cups sugar
3 eggs
1 teaspoon vanilla
1/2 teaspoon salt
1 cup flour

Directions:
Preheat oven to 350*F. Greatse 13x9 pan.
Microwave chocolate and butter in large microwaveable bowl on high 2 min. or until butter is melted. Stir until chocolate is completely melted. Stir in sugar. Blend in eggs and vanilla. Add flour and salt; mix well. Spread into prepared pan.
Bake 30 to 35 minutes or until toothpick inserted in center comes out pretty clean.
Cool the brownies, and then cut them into 3/4 to 1 inch squares for use in the cheesecake. You will only need 2 cups of the brownie squares for the cheesecake, so you will have to decide what you want to do with the rest of the brownies. :)

Here's a picture of the brownies that I had left AFTER I cut out the ones needed for the cheesecake.


Next, I made the oreo crumb crust. I doubled this recipe, because I like a lot of crust. However, I felt that was even toooo much crust, so I suggest just making it as the recipe says.

I do also have to give a big THANKS to Josh, for scooping all of the middles out of the Oreos, and then crushing them to use for the crust. :)

Crumb crust:
Ingredients:
1 1/2 cups (or 5 ounces) finely ground Oreos (or another chocolate cookie)
5 tablespoons unsalted butter, melted
1/3 cup granulated sugar
1/8 teaspoon salt

Dirctions:
Stir together ingredients and press into the bottom and 1 inch up the side of a buttered 10" springform pan. Fill right away with the cheesecake, or chill for up to 2 hours.

My picture-taking abilities aren't that great, but here's a picture of my crust in the pan:


Now, for the cheesecake:

Ingredients:
3 (8 oz.) packages of cream cheese, softened
1 cup granulated sugar
4 large eggs
1 teaspoon vanilla

Directions:
Make crumb crust as directed above for 10-inch cheesecake.

Preheat oven to 350*F.
Beat together cream cheese and sugar with an elecctric mixer until fluffy. Add eggs, 1 at a time, then vanilla, beating on low speed until each ingredient is incorporated and scraping down bowl between additions.

Fold brownie cubes in very gently and pour mixture in prepared pan. Put the springform pan on a baking sheet, to catch drips, and bake for 45 minutes, or until cake is set 3 inches from edge but center is still slightly wobbly when pan is gently shaken.

Here's a picture of my cheesecake:


And, finally, the Ganache Glaze:

Ingredients:
3 oz. bittersweet chocolate, finely chopped
4 tablespoons (1/2 stick) unsalted butter
1/4 cup heavy cream
1/2 teaspoon vanilla
1 tablespoon powdered sugar

Directions:
Place finely chopped chocolate in a medium sized mixing bowl. Scald the butter and the cream together in a saucepan (or in the microwave 1 min.). Pour the cream mixture over the chocolate and stir until the chocolate is completely melted. Whisk in vanilla and then whisk in powdered sugar until smooth. Spread over the cheesecake while ganache is still warm.

Chill the cheesecake until ready to serve.

And, here are some final pictures of my cheesecake. I will say, it was DELICIOUS. And let me just say that if I can make this recipe, anyone can! It was easy. Just a little time-consuming.


Now, let's move on to #38: Make a new recipe every month. After a lot of searching, I decided to make Cheese Chicken Crescent Supper.

I was a little nervous about it while making it, but it turned out to be VERY GOOD! Everyone who ate it, liked it.

Here's the recipe:
Ingredients:
2 cups chicken, cut into small cubes (I used 2 chicken breasts, cut up)
2 cups shredded cheddar cheese (separated)
1 10.5 oz. can condensed cream of chicken soup
1 cup milk
1 8 oz. can Pillsbury refrigerated crescent rolls
Salt and pepper to taste

Directions:
Preheat oven to 350*F. Grease a 13x9 pan. In a large bowl, mix the chicken and 1 cup of the cheese, and the salt and pepper. Set aside.
In a small saucepan, heat the condensed soup, milk, and 1/2 cup of the cheese. Heat over medium heat until cheese melts and sauce simmers.

Spread a thin layer of sauce over the bottom of the pan. Reserve the remaining sauce. Open the crescent rolls, separate into individual triangles. Place 2 tbsp. of the chicken mixture on a triangle, and roll it up into a crescent shape with the chicken mixture inside. Place on top of sauce in the pan. Repeat, and line up all of your crescents in the pan about 1 inch apart. Sprinkle remaining 1/2 cup of cheese over the top.

Bake for 20-25 minutes or until crescents are puffy and lightly browned. Serve with remaining sauce, and enjoy!

I don't have any of my own pictures, because by the time I took it out of the oven, we were hungry and just wanted to eat it. But here's a picture from the recipe I took it from: (and I'm happy to say, mine actually looked like it was supposed to!)


And, now, you ask, who at all of this wonderful food? Not just Josh and me! I then completed #45: Have another couple over for dinner. My best friend, Marisa, and her husband, Tim, came over to enjoy this food. It was nice to have company, since it doesn't happen very often! I didn't take any pictures of us, but here is a picture of Marisa and Tim on their wedding day this past September. (not the best picture, but it was all I had of the two of them!)


And because I hung out with Marisa last night, #12 has been done this month. (Although, I do hope to hang out with her more!)

See, I told you it was a big night. Oh, and I can't forget, Josh and I read through a little of Acts Ch. 9 last night. (#1: Read the Bible with Josh once a week). We're currently studying the Book of Acts for our 20-somethings Group at church. We usually read the part for the week separately, but we've been trying to do it together lately. We're hoping to read through more of it tonight, so I'll have to let you know what comes from that!